How To Remove Anti Scald Valve Bathtub?
If you’re like me and enjoy tackling home improvement projects yourself, you may eventually need to replace the anti-scald valve on your bathtub. Though it may seem daunting, with the right preparation and patience, this is totally a DIY job that you can handle yourself.
I recently went through the process of removing and replacing an old, faulty anti-scald valve in my master bathroom tub, and I learned a lot along the way. In this article, I’ll walk you through the steps I followed so you can avoid rookie mistakes and get your tub’s hot water working again quickly and safely.
It involves turning off the water, detaching supply lines, removing the old valve, installing a new valve, reattaching lines, testing the water temp, and replacing the tub access panel. With proper preparation and patience, a faulty anti-scald valve can be successfully removed and replaced without calling a professional plumber.
Reasons for Replacing an Anti-Scald Valve
There are a few reasons you might need to remove your tub’s old anti-scald valve. First, if it’s plainly not working right – the hot water doesn’t get hot or takes forever to warm up – the valve itself has probably failed and needs to be replaced.
I experienced this in my house’s master bathroom tub after a few years of use. Even cranking the faucet all the way to hot yielded lukewarm water, not hot enough for a relaxing bath. Obviously, the anti-scald valve wasn’t doing its job regulating the temp.
You might also need a new anti-scald valve if you’re remodeling the bathroom and installing a new tub. New tubs often come with their own valves that should be used instead of the old ones. And if you’re converting your tub into a walk-in shower, the anti-scald valve needs to come out completely to make way for new shower plumbing and valves.
Before You Start
Before starting this project, make sure you turn off the hot and cold water supply valves under the tub or sink. Trust me, you don’t want water gushing everywhere when you disconnect those supply lines!
It’s also a good idea to open the tub faucet and let any remaining water drain out before getting to work. Make sure you have the new replacement anti-scald valve on hand before removing the old one too. Nothing worse than realizing mid-project that you’re missing a critical piece!
How To Remove Anti Scald Valve Bathtub?
Alright, let’s get to the valve removal. Start by locating the access panel underneath the tub where the valve and plumbing are hidden. This is usually a small removable panel towards the drain end of the tub.
You may need to poke around a bit with a flashlight to find it. Once located, unscrew the panel so you can get your hands and tools inside. Have a towel ready to place under the opening to catch any drips.
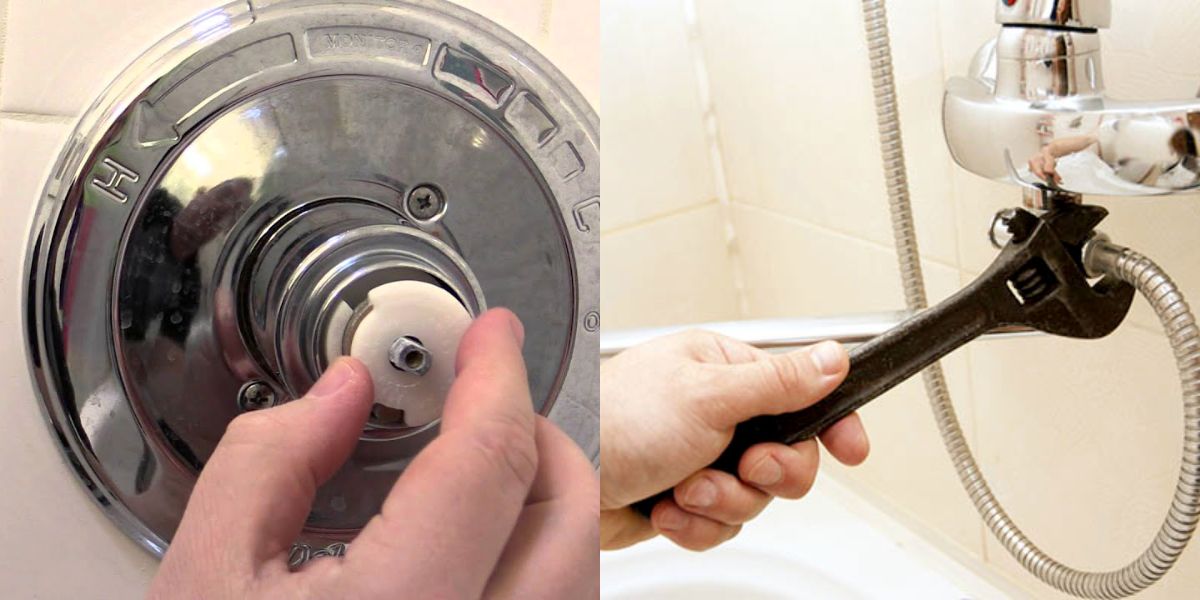
Here’s where the fun starts! Look for the supply lines that go from the hot and cold shut-off valves up to the anti-scald valve. They are usually copper pipes or flexible braided stainless steel lines. Loosen the compression nuts or other connectors that attach the lines to the valve. You may need both a wrench and a pair of pliers to loosen them fully. Expect some water to drip out when disconnected – that’s normal.
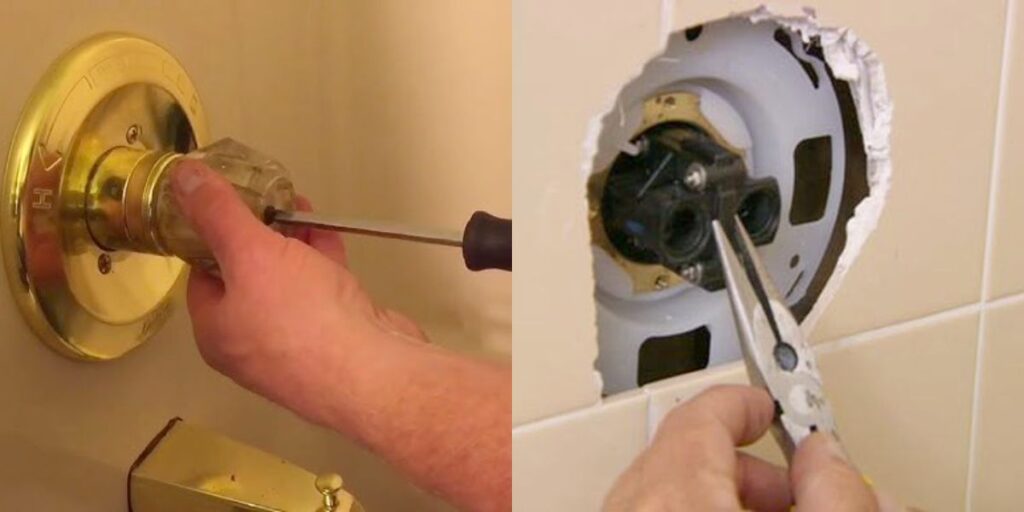
Once the supply lines are detached, look for the mounting hardware that secures the valve to the tub, usually a threaded rod and nuts. Carefully unscrew the nuts to free the valve so you can remove it. Be prepared to use a wrench for this, and have somewhere to place the small hardware once it’s off.
Alright, go ahead and grab that old anti-scald valve and work it out of the access hole. Depending on its age, you may need to wiggle, twist, and turn it to get it out intact. Some stubborn mineral build-up may require gently tapping the valve with a hammer. Just be patient and work it free slowly.
Congratulations – you’ve removed the old valve! Now it’s time to install the new one.
Installing the New Anti-Scald Valve
Start by preparing the replacement valve according to the manufacturer’s instructions. Make sure to apply plumber’s tape to any threaded portions that will connect to supply lines or tub hardware. This will ensure water-tight seals when you complete the installation.
Carefully insert the new valve into the opening and position it where you removed the old one. Reconnect and tighten the mounting nuts and hardware to secure it firmly. Then, attach the hot and cold supply lines to the proper valve connections. Tighten the compression nuts with pliers, but don’t over-tighten. You want them snug, but not so tight they damage the valve.
Once secured, turn the hot and cold water back on slowly. Check for any leaks and tighten fittings if necessary. Let the tub faucet run for a while to purge any air and sediment from the lines. Test the new anti-scald valve by running a hot bath. Verify it’s delivering the right hot water temp and maintaining a balance between hot and cold. Success!
Finishing Touches
You’re almost home free. Now it’s time to tidy up underneath the tub before reattaching the access panel. Make sure any insulation or vapor barrier material is back in place over the plumbing. Remove any tools or debris before sealing up the hole. Run a damp rag around the edges to clean up dust or grime.
Carefully put the access panel back into position and screw it back in place. Take time to ensure it fits snugly and evenly. Uneven gaps or loose edges may allow moisture and mold growth underneath the tub over time. Apply clear caulk around the edges for a water-tight seal if needed.
Testing the New Valve
Turn the hot water on full blast for a final check. Let it run a while and feel the temperature to ensure your new anti-scald valve is regulating the temp properly. Running a tub full of hot water is another good test. Make small adjustments to the valve per the manufacturer’s instructions if the hottest setting is still not hot enough for your liking.
Tips for Success
Replacing a faulty tub valve yourself is a very rewarding DIY project. But I learned a few tips along the way that can make the process smoother:
- Use plumber’s tape on all threaded connections – They’ll form water-tight seals without over-tightening.
- Label supply lines as you detach them – Keeping hot and cold straight will prevent mix-ups later.
- Keep all hardware together – Those small nuts and bolts are easily lost!
- Don’t force valves into place – Use a little wiggle and patience for easy threading.
- Be patient – This is a cramped working space, so take your time.
- Consider calling a plumber if any steps seem too difficult – Better safe than sorry with plumbing projects!
Conclusion
I definitely encourage you to tackle replacing your own tub hardware. The right preparation and tools make this is completely doable DIY project. Just remember to work slowly, be safe, and call a professional if anything seems unsafe or too complex. But with a little perseverance, you can absolutely take care of this repair yourself. Plus, you’ll save a chunk of money on plumber labor costs.
Let me know if you have any other questions! I’m happy to provide more details on how I completed this project successfully. Replacing bathtub valves, supply lines, and other hardware may seem intimidating at first, but homeowners with some DIY experience can certainly take care of these repairs themselves. And nothing beats that feeling of accomplishment when you turn the valve and hot water flows freely from the tap once again!
Frequently Asked Question
Where is the anti-scald valve located on my bathtub?
The anti-scald valve is usually located behind an access panel at the drain end of the tub. You may need a flashlight to locate it.
Do I need to turn off the water before removing the old anti-scald valve?
Yes, you should turn off the hot and cold water supply valves before disconnecting any plumbing lines to remove the old valve. This prevents water from gushing out.
What tools do I need to replace a bathtub anti-scald valve?
Common tools needed are wrenches, pliers, screwdrivers, flashlights, towels, replacement valves, plumber’s tape, and caulk/sealant. Labeling supply lines helps avoid mix-ups.
How to adjust anti scald valve?
You can adjust the temperature setting on most anti-scald valves. Locate the adjustment screw and turn it clockwise to increase the max temp or counter-clockwise to decrease it. Test the water to find your preferred temperature. Just be careful not to set it too high to avoid scalding.
How to bypass an anti scald valve?
To bypass an anti-scald valve, you’ll need to completely disconnect it from the hot and cold water supply lines. Install a standard mixing valve instead and connect the hot and cold lines to that. Bypassing the anti-scald valve will remove the temp safety feature. Only do this if the valve is defective and you plan to replace it soon.

William J. Bullock is a licensed plumber with over 15 years of experience installing and repairing bathtubs. He runs his own plumbing company in Greenville and serves residential and commercial clients. William is dedicated to providing honest, transparent advice to help homeowners make informed decisions about their bathroom renovations.
He has established expertise in selecting bathtubs, planning custom installations, diagnosing issues, and completing repairs. William aims to share practical tips and reliable recommendations based on extensive hands-on work. When he isn’t on a job site, William enjoys spending time with his family and volunteering at local community events. He takes pride in delivering quality service and enjoys helping people upgrade their homes.