How To Seal Off A Bathtub Overflow?
Those persistent drips can quickly turn into huge headaches if you don’t take care of them right away. Recently, I found myself once again trying to figure out how to seal off my old bathtub’s faulty overflow.
After some trial and error attempts, I finally discovered a process that worked to permanently stop the leakage. If you’re struggling with a similar overflow issue, I’ll walk you through how I was able to fix it myself without calling a plumber. Believe me, I learned the hard way that a leaky overflow should never be ignored!
The key steps are: turn off the water supply, remove the old overflow plate and gasket, clean the area thoroughly, apply fresh plumber’s putty around the overflow hole, install new rubber gasket, reassemble the overflow pipe and plate components, let cure overnight, test for leaks by filling the tub, and do annual maintenance checks to ensure the seal holds. Use care not to damage the new gasket or putty seal over time.
Why Bathtub Overflows Leak?
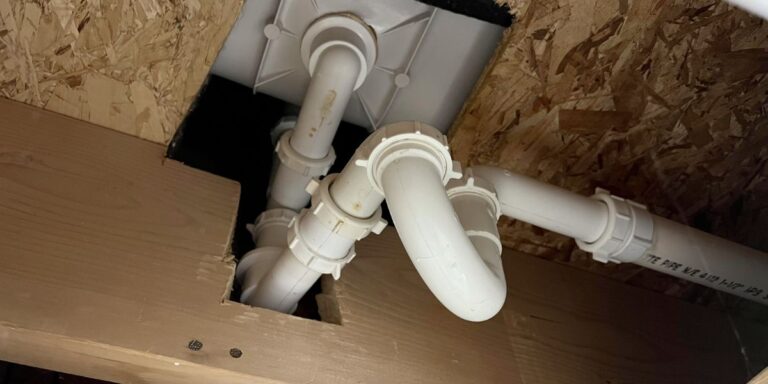
Before I could actually seal my bathtub overflow, I needed to understand basically why water was escaping through it in the first place. Most modern bathtubs have an overflow drain in addition to the main drain you pull the stopper out of. This acts as a fail-safe to prevent spillover if you accidentally fill the tub too high.
I kind of assumed the bathtub overflow was supposed to be watertight, but that’s not really the case. The overflow drain does have a cover plate, but there’s usually a slight gap around it. This allows air pressure to equalize so water flows down the main drain smoothly. However, that gap also provides an opportunity for water to drip out if the bathtub’s overflow gasket gets damaged or worn out over time.
In my situation, the gasket around the overflow plate was basically crazily cracked and brittle. So basically small amounts of water were seeping through each time I took a bath. Annoyingly, the drips were minor at first, but got worse over several weeks. I knew I needed to take action before the leakage caused water damage behind the tub surround.
See also, if your tub is dirty: Best Bathtub Cleaner Without Scrubbing | Tested By Amanda
Gathering the Right Overflow Seal Supplies
Before jumping into such an annoying project, it’s important to make sure you gather the right supplies. Here’s what I needed to seal off my tub’s leaky overflow:
- New overflow plate gasket – I opted for a universal retrofit gasket kit with gaskets made of flexible rubber. This created a super tight seal once installed.
- Plumber’s putty – In addition to the gasket, I got some plumber’s putty to help create a watertight barrier.
- Old rag – Useful for wiping up any drips or spills while working above the overflow.
- Flashlight – This helped me see while accessing the cramped area behind the tub.
- Gaskets – I used these to seal any gaps around the overflow cover plate.
- Basic tools – Wrenches, screwdrivers, etc. to remove the old overflow and install the new one.
I was relieved to find that the supplies were available at my local hardware store. Before starting the project, I also made sure to clear space around the tub and lay down some towels in case of spills.
Removing the Old, Leaky Overflow
With my supplies gathered, I was ready to basically start the repair process by removing the old, faulty overflow components. This was a crucial first step before installing the new gasket and seal.
Working in the tight space behind the tub wasn’t fun, but I was able to follow these steps:
First, I turned off the bathtub’s water supply so I could work safely without spurts of water shooting out.
Next, I used a wrench to loosen and disconnect the overflow pipe from the bathtub’s shoe. This allowed me to fully remove the overflow plate and assess the damage behind it.
I scraped off all the old plumber’s putty and gasket material surrounding the overflow opening using a plastic putty knife.
Finally, I used a wire brush to thoroughly clean the area so the new sealants would properly adhere.
While tackling this messy process, I was extra glad that I laid down towels first! It definitely minimized the cleanup later.
Applying Plumber’s Putty to the Overflow Hole
With the old overflow completely removed, I could start rebuilding the watertight barrier. This involved first applying fresh plumber’s putty around the overflow hole:
I took a lime-sized ball of putty and rolled/pressed it into a “rope” using my hands.
Working carefully, I firmly pressed the putty rope around the entire overflow opening, sticking it securely to the bathtub surface.
I made sure to use enough putty to form a thick, watertight seal all the way around.
Excess putty was trimmed away using a plastic putty knife. I left an equal margin around the hole.
Per the manufacturer’s instructions, I gave the putty at least 30 minutes to partially cure before moving on.
Plumber’s putty hardens over time, creating a durable seal. So this step really built the base for my overflow repair.
Installing the New Overflow Gasket
Here’s where the new gasket came in – providing a flexible, watertight seal between the overflow plate and bathtub surface:
I test-fit the gasket first, trimming any excess length if needed for a custom fit.
Peeling back the adhesive backing, I pressed the gasket firmly in place around the overflow hole.
The new gasket is molded perfectly to fill any small gaps or irregularities in the opening.
I took my time working the gasket into place to maximize adhesion and prevent future leakage.
With the gasket installed, I could move on to the final steps of reassembling the overflow components.
Reconnecting the Overflow Pipe & Plate
At this point, I was on the home stretch – just needed to reassemble everything for the finished repair:
Carefully, I inserted the overflow pipe back into the bathtub shoe and tightened it with a wrench.
I checked the fit of the overflow cover plate before applying a thin rope of plumber’s putty around its edge.
Once the plate was centered in place, I gently pressed it into the putty for a complete seal.
The new gaskets provided a protective buffer between the metal plate and the porcelain tub.
Finally, I hand-tightened the overflow plate screws and cleaned up any excess putty.
After leaving the full assembly overnight to cure, I crossed my fingers and hoped for success!
Testing the New Overflow Seal
The moment of truth had arrived! I needed to test my freshly sealed overflow to ensure no more drips or leaks.
Cautiously, I turned the bathtub faucet on about halfway to start filling the tub.
As the water reached the normal full line, I watched carefully around the overflow plate.
Success! No water emerged from the overflow as I topped off the tub a bit more.
I let the bathtub sit full for over 30 minutes and continued seeing zero leakage.
Relieved, I pulled the drain stopper and emptied the tub while doing a final inspection.
My DIY efforts to seal the overflow definitely passed the test! I could now relax in a peaceful, leak-free bath once again.
Maintaining an Overflow Seal Over the Long Term
Although my overflow repair held up nicely, I realized this likely wouldn’t be a one-and-done project. To help my new seal last:
- I try to avoid slamming the overflow plate with bottles, etc. This could risk cracking the tub surface or damaging the gasket.
- About once a year, I do a check for any new drips or moisture around the overflow. If needed, I re-apply plumber’s putty to refresh the seal.
- I use a gentle touch when installing the drain stopper so it doesn’t loosen the overflow components. Excessive force can break the watertight barrier over time.
- When cleaning the bathtub, I’m careful not to use abrasive cleaners or scouring pads around the overflow. This preserves the finish.
With proper care and maintenance, my hope is that I won’t have to battle this annoying issue again for quite a while! But if leaks do recur, at least I now know exactly how to seal off a bathtub overflow.
Conclusion:
In the end, I was really proud that I could tackle this repair myself without calling in a plumber. Patience and the right materials were key to creating a successful watertight seal. For any other homeowners dealing with an overflow leak, I hope my experience gives you the confidence to fix it yourself! Just be sure to turn off the water supply first and have plenty of towels on hand.

William J. Bullock is a licensed plumber with over 15 years of experience installing and repairing bathtubs. He runs his own plumbing company in Greenville and serves residential and commercial clients. William is dedicated to providing honest, transparent advice to help homeowners make informed decisions about their bathroom renovations.
He has established expertise in selecting bathtubs, planning custom installations, diagnosing issues, and completing repairs. William aims to share practical tips and reliable recommendations based on extensive hands-on work. When he isn’t on a job site, William enjoys spending time with his family and volunteering at local community events. He takes pride in delivering quality service and enjoys helping people upgrade their homes.